
A fresh coat of paint is one of the most effective ways to boost your home's curb appeal and protect it from the elements. But a paint job is only as good as the preparation and application that go into it. Poorly executed exterior painting can lead to a host of frustrating and unsightly problems, turning your investment into a costly headache.
Understanding the common pitfalls of exterior painting can help you ensure a beautiful, long-lasting finish. This guide will walk you through seven frequent issues—from blistering and peeling to fading color—and explain how to prevent them. By knowing what can go wrong, you can take the right steps to get the job done correctly the first time.
1. Blistering or Bubbling Paint
Paint blisters are bubbles that form on the surface of the paint, often shortly after the paint has dried. They occur when a layer of paint lifts from the underlying surface.
What Causes It?
Blistering is typically caused by moisture or heat.
- Moisture: If you paint over a damp or wet surface, the moisture gets trapped. As the sun heats the house, this moisture turns to vapor and pushes the paint away from the surface, creating a bubble. High humidity in areas like Florida can make this a frequent problem.
- Heat: Painting in direct, intense sunlight can cause the top layer of paint to dry too quickly. This traps solvents or moisture underneath, which then form blisters as they try to escape.
How to Avoid It:
- Ensure the surface is completely dry. Wait at least 24-48 hours after pressure washing or a heavy rain before you begin painting. Use a moisture meter for a precise reading if you're unsure.
- Paint at the right time of day. Avoid painting in direct sunlight. Start on the shady side of the house and follow the shade throughout the day. The ideal temperature for most exterior paints is between 50°F and 90°F.
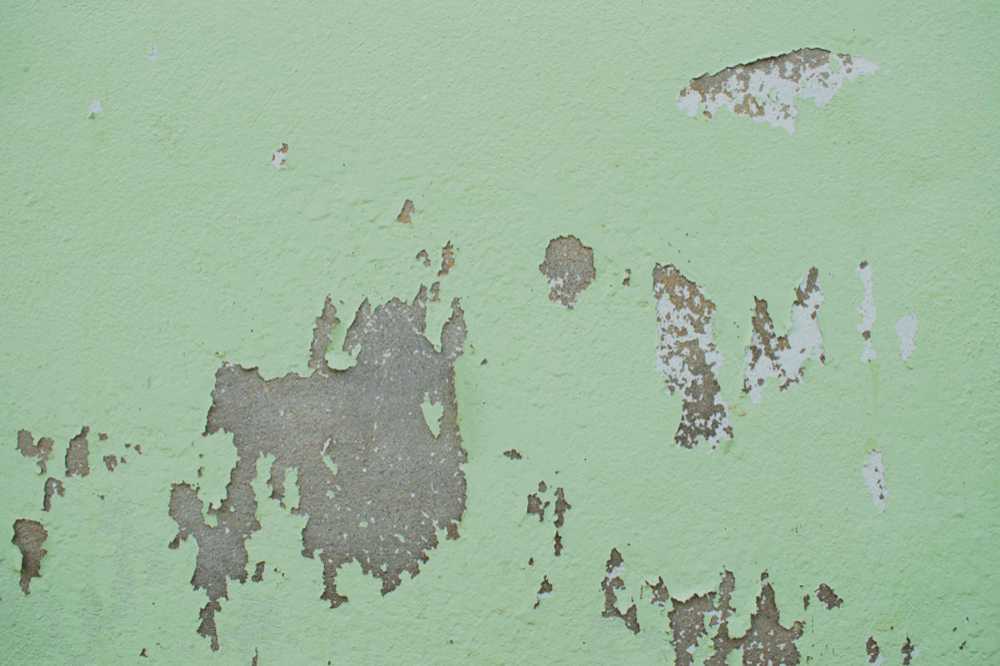
2. Peeling or Flaking Paint
Peeling is when paint chips or flakes away from the surface, often in large strips. This is a clear sign of adhesion failure.
What Causes It?
Peeling is almost always the result of inadequate surface preparation.
- Painting over a dirty surface: Dirt, grime, mildew, or chalky residue prevents the new paint from bonding properly.
- Skipping primer: Applying paint directly over a bare or glossy surface without a primer can lead to poor adhesion.
- Moisture issues: Similar to blistering, moisture getting behind the paint film can break the bond and cause it to peel away.
How to Avoid It:
- Thoroughly clean the surface. Pressure wash the exterior walls to remove all dirt, chalk, and mildew. Allow it to dry completely.
- Scrape and sand. Remove all loose or flaking old paint with a scraper, wire brush, or sander. Feather the edges of the remaining paint to create a smooth transition.
- Always use a high-quality primer. A primer creates a stable, uniform surface for the new paint to adhere to, which is especially important on bare wood, metal, or previously glossy surfaces.
3. Chalking
Chalking is a fine, powdery substance that forms on the surface of exterior paint over time. You can detect it by wiping your hand across the surface; if a chalk-like residue comes off, the paint is chalking.
What Causes It?
Chalking is the natural erosion of the paint film caused by exposure to sun and rain. While a small amount of chalking is a normal part of the aging process for some paints, excessive or premature chalking indicates a problem. Often, it's a sign that a low-quality, interior-grade, or improperly formulated paint was used on the exterior.
How to Avoid It:
- Use high-quality exterior paint. Choose a 100% acrylic latex paint designed for exteriors. These paints are formulated with binders that resist breaking down under UV exposure.
- Prepare chalky surfaces correctly. Before repainting a chalky surface, you must remove all the residue. Pressure washing is the most effective method. After cleaning, apply a specific chalk-binding primer to ensure the new topcoat adheres properly.
4. Cracking or Alligatoring
"Alligatoring" is a specific type of cracking where the paint splits into a pattern that resembles the scales of an alligator. This indicates the topcoat of paint has lost its elasticity and can no longer expand and contract with the surface.
What Causes It?
- Applying a hard topcoat over a soft primer: If the primer is more flexible than the topcoat, the topcoat will crack as the surface moves.
- Applying a second coat before the first is dry: This can interfere with the curing process and lead to stress in the paint film.
- Paint aging: As paint ages, it naturally loses its flexibility and can begin to crack.
How to Avoid It:
- Follow product instructions. Use a compatible primer and topcoat system from the same manufacturer.
- Allow proper drying time. Wait for the primer and each coat of paint to dry completely according to the manufacturer's directions before applying the next.
- Scrape and prime. If alligatoring has already occurred, you'll need to remove all the cracked paint, sand the surface smooth, apply a high-quality primer, and then repaint.
5. Fading Color
Fading happens when the paint color loses its vibrancy due to exposure to the elements, particularly sunlight. This is a more significant issue in sunny climates like Florida.
What Causes It?
The primary cause of fading is UV radiation from the sun, which breaks down the pigments in the paint. Darker and more vibrant colors like deep reds, blues, and yellows are more susceptible to fading than lighter, earth-toned colors. Low-quality paint also uses pigments that are less resistant to UV damage.
How to Avoid It:
- Choose a high-quality, UV-resistant paint. Look for 100% acrylic latex paints with high-quality pigments and binders. These are engineered for superior color retention.
- Consider the color. If your home gets intense, all-day sun, consider using lighter shades, as they reflect more light and are less prone to fading.
- Apply two topcoats. A second coat of paint provides better coverage and added protection against UV rays, helping the color last longer.
6. Mildew or Mold Growth
Mildew and mold appear as black, gray, or green spots on the surface of the paint, especially in shady, damp areas.
What Causes It?
Mildew thrives in areas with high humidity, poor airflow, and limited direct sunlight. It feeds on the paint film itself or on dirt that has accumulated on the surface.
How to Avoid It:
- Clean the surface thoroughly. Before painting, wash the walls with a solution of one part bleach to three parts water to kill any existing mildew. Rinse well and let it dry.
- Use a paint with mildewcide. Many high-quality exterior paints are formulated with additives that inhibit the growth of mold and mildew.
- Address moisture sources. Trim back shrubs and trees that are too close to the house to improve airflow and allow more sunlight to reach the walls.
7. Lap Marks
Lap marks are visible stripes on a painted surface that show where you have overlapped a freshly painted area with one that is already partially dry.
What Causes It?
Lap marks occur when you don't maintain a "wet edge" while painting. This happens when the paint dries too quickly, which is a common challenge when working in the heat and sun.
How to Avoid It:
- Plan your work. Work in small, manageable sections to ensure you can keep a wet edge.
- Paint from a wet edge to a dry area. Always paint into the last wet stroke. On a wall, start at one corner and work your way across, rather than painting the middle first.
- Avoid painting in direct sunlight or high heat. The hotter it is, the faster your paint will dry, making it difficult to avoid lap marks.
Get Your Exterior Paint Job Done Right
A successful exterior painting project requires careful planning, meticulous prep work, and the use of high-quality materials. While it’s possible to tackle the job yourself, avoiding these common problems requires experience and skill. Hiring a professional can save you time, prevent costly mistakes, and ensure a finish that will protect and beautify your home for years.
If you're looking for expert exterior painters in Orlando, FL, the team at Rusty's Painting has the knowledge and experience to deliver flawless results. We understand the unique challenges of the Florida climate and use only the best products and techniques. Contact us today to request an estimate and give your home the beautiful, durable finish it deserves.